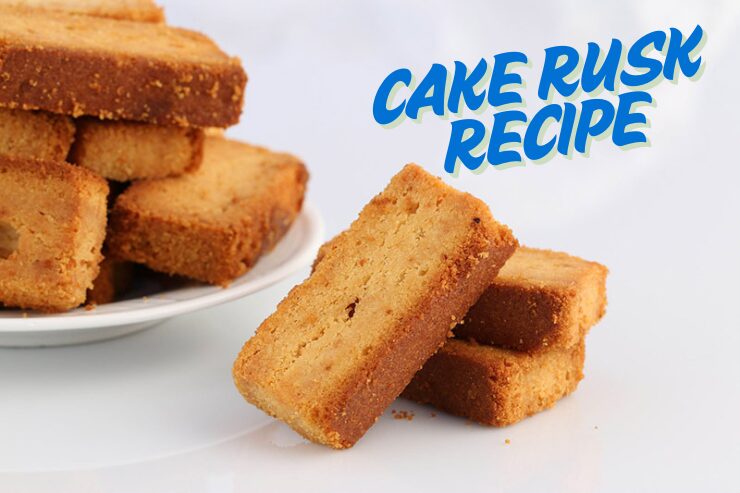
Cake Rusk Recipe
Cake Rusk Recipe: 5 Simple Steps to a Crunchy, Golden Treat!
Who doesn’t love a crunchy, golden, and delicious snack to dip in their tea? ☕ If you’re a fan of crispy treats that melt in your mouth with every bite, then this Cake Rusk Recipe is exactly what you need! Forget the store-bought versions filled with preservatives—this homemade delight is easy to make and tastes a hundred times better. So, roll up your sleeves, preheat that oven, and let’s get baking!
Why You’ll Love This Cake Rusk Recipe? 😍
- Easy to Make – Just 5 simple steps, and you’re done!
- Crispy & Buttery – The perfect crunch with every bite.
- Perfect for Tea Time – Because dunking is a lifestyle.
- No Fancy Ingredients – Everything’s already in your kitchen.
- Homemade Goodness – No preservatives, just love! ❤️
Ingredients You’ll Need 🛒
For the Cake Base:
- 1 cup all-purpose flour
- 1/2 cup sugar
- 1/4 cup butter (softened)
- 2 eggs
- 1/2 teaspoon vanilla extract
- 1 teaspoon baking powder
- 1/4 cup milk
- A pinch of salt

For the Rusk Magic:
- 1 tablespoon butter (for brushing)
- A sprinkle of love (optional, but recommended 😉)
5 Simple Steps to Make Cake Rusk 🍰➡️🥖
Step 1: Bake the Cake 🎂
Start by preheating your oven to 180°C (350°F). Grease a baking pan and line it with parchment paper. In a bowl, beat butter and sugar until fluffy. Add eggs one at a time, mixing well. Stir in vanilla extract. Gradually add flour, baking powder, and salt, alternating with milk. Mix until smooth, then pour into the pan. Bake for 25-30 minutes or until a toothpick comes out clean.
Step 2: Cool and Slice 🏖️
Patience is key here (which I never have, but you should!). Let the cake cool completely before slicing. Cut it into even, thick strips—about 1-inch wide. These are your future rusks, so make them count!
Step 3: Bake Again! (Twice-Baked Goodness) 🔥
Lower the oven temperature to 150°C (300°F). Place your cake strips on a baking tray and bake for 15 minutes on one side. Flip them over and bake for another 10-15 minutes until they’re golden and crispy.
Step 4: The Secret to Crunch 🤫
Want that extra crunch? Once baked, leave the rusks in the warm oven for an additional 10 minutes with the door slightly open. This helps them dry out completely.
Step 5: Enjoy! 🥳
Let the rusks cool completely before storing them in an airtight container. Now, grab a cup of tea, dunk away, and enjoy your crunchy, golden masterpiece!
Cake Rusk Recipe Menu & Prices 🏷️
| Category | Item | Price (PKR) |
|---|---|---|
| Appetizers | Butter Cookies | 150/- |
| Almond Biscuits | 180/- | |
| Main Courses | Tea Cake | 250/- |
| Sponge Cake | 300/- | |
| Desserts | Cake Rusk (500g) | 350/- |
| Vanilla Cupcakes | 200/- | |
| Beverages | Karak Chai | 100/- |
| Doodh Pati | 120/- |
FAQs About Cake Rusk Recipe ❓
1. Can I use whole wheat flour instead of all-purpose flour?
Yes! Whole wheat flour will make the rusks slightly denser, but they’ll still be crunchy and delicious.
2. How long can I store homemade cake rusks?
Stored in an airtight container, they’ll stay fresh for up to two weeks (if you don’t finish them in two days, that is!).
3. Can I make this recipe without eggs?
Absolutely! Replace eggs with 1/4 cup yogurt or mashed banana for an eggless version.
4. Why are my rusks not crunchy enough?
Make sure to bake them at a low temperature for long enough and leave them in the oven after turning it off for extra crispiness.
5. Can I add nuts or dried fruits?
Of course! Adding almonds, pistachios, or raisins will give your rusks an extra layer of flavor.
6. What’s the best way to eat cake rusk?
Dunk it in tea, coffee, or warm milk. But let’s be real—you’ll probably eat half of them straight from the jar! 🤣
Final Thoughts 🎉
There you have it—your very own, homemade Cake Rusk Recipe! With just a few ingredients and simple steps, you can enjoy a crispy, buttery treat anytime you like. Plus, the satisfaction of making these from scratch? Unmatched!
So, next time someone asks, “Why is your tea-time snack so delicious?” just smile and say, “It’s a secret!” (or, you know, send them this recipe 😉). Happy baking!